![Icon for Courses-1.png]](https://help.oneclickcontractor.com/hs-fs/hubfs/Icon%20for%20Courses-1.png?width=36&height=36&name=Icon%20for%20Courses-1.png)
Overview
MarketSharp appointment and inquiry data is checked every 15 minutes and used to create or update OCC jobs when the salesperson mapping and associated records meet the requirements below. OCC does not offer filters or custom field mapping for this integration. Appointment results and result reasons entered in OCC are the documented writeback exception; changing an OCC job status does not update MarketSharp.
Before you troubleshoot a job
-
Confirm the MarketSharp salesperson assigned to the appointment has an active mapping to an OCC user. See the separate MarketSharp setup and user mapping procedure.
-
Confirm the appointment is associated with both a MarketSharp contact and an inquiry.
-
Check whether the appointment was modified since the last sync or falls within the documented appointment date window.
Step by step
Step 1: Check that the appointment qualifies for synchronization
The MarketSharp user assigned to the appointment must be mapped to an OCC user and the mapping must be active. The appointment must have an associated contact and inquiry. OCC looks for appointments modified since the last sync or scheduled from 10 years in the past through 100 years in the future.
Step 2: Allow for the scheduled job sync
MarketSharp job and appointment updates are pulled every 15 minutes, at :00, :15, :30, and :45 after the hour. There are no configurable filters for selectively importing MarketSharp jobs and no alternate/custom job field mapping.
Step 3: Use Sync to expedite or initialize a pull
On the MarketSharp integration card, select Sync. The Initial Sync pulls salesperson users and links them by email, retrieves appointment Result and Result Reason lists for the organization, and pulls appointments for actively mapped OCC users. If the user synced before, the integration uses the last sync time; for a first sync, it looks for appointments scheduled 29 days prior or in the future.
Step 4: Review the job and customer mapping
OCC uses the following documented values:
Step 5: Review the metadata OCC stores
The job metadata includes marketsharp_id from {inquiry.id}, marketsharp_contact_id from {contact.id}, and marketsharp_salesperson from {appointment.salesperson}. The appointment metadata uses marketsharp_id from {appointment.id}.
Step 6: Review the appointment and note mapping
Appointment summary comes from {appointment.type}; appointment notes from {appointment.notes}; start time from {appointment.appointmentDateTime} in the company's time zone; and end time is start time plus the default duration, which is two hours. The appointment note is formatted as MarketSharp {appointment.startTime} Appointment Note: {appointment.notes}. The job inquiry note is formatted as MarketSharp Inquiry Note: {inquiry.notes}.
Step 7: Choose document attachment preferences in OCC
Open the MarketSharp integration card and select Settings > Document Attachment Preferences. Select when OCC should attach each document category, then select Save Changes. Available options in the supplied screen are:
Proposal: Button, Email
Agreement: Button, Email, Sent, Signed, Result Signed
Signable Documents: Sent, Signed
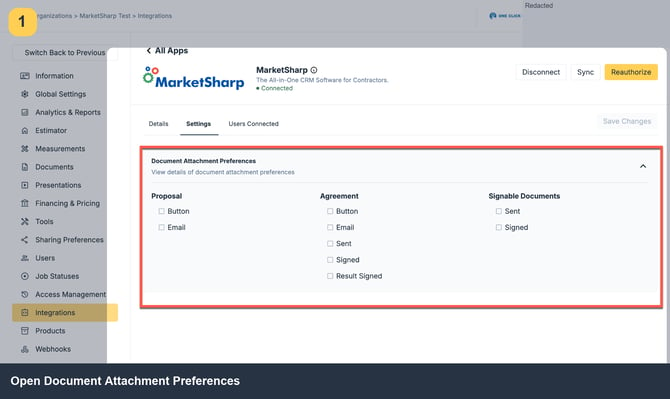
Image description: MarketSharp Settings showing Document Attachment Preferences.
Step 8: Find an uploaded document in MarketSharp
Documents OCC automatically uploads are attached to the MarketSharp Contact associated with the inquiry. Open that contact and inspect its Attachments section.
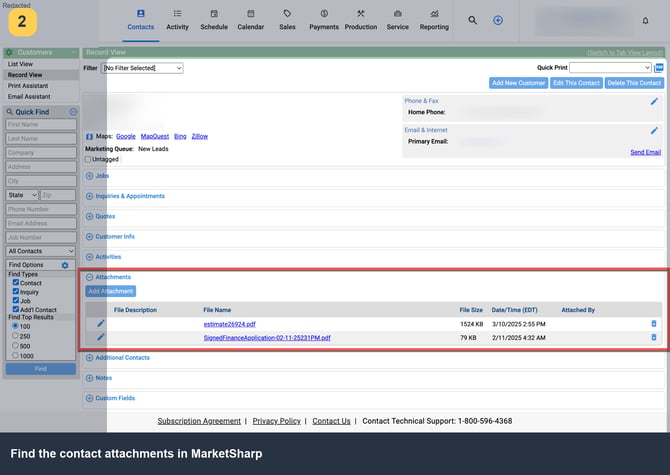
Image description: Contact record in MarketSharp with the Attachments section visible.
Step 9: Open the result action for an OCC appointment
In the OCC job, open the Appointments tab and select the result control for the appointment.
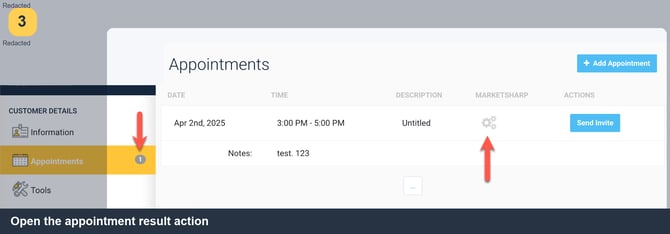
Image description: OCC customer appointment list with the appointment result control.
Step 10: Enter the appointment result and reason
In the Result Appointment dialog, select a Result and Reason. Add notes if needed, then select Save Changes. The values are sent to the corresponding MarketSharp appointment fields.
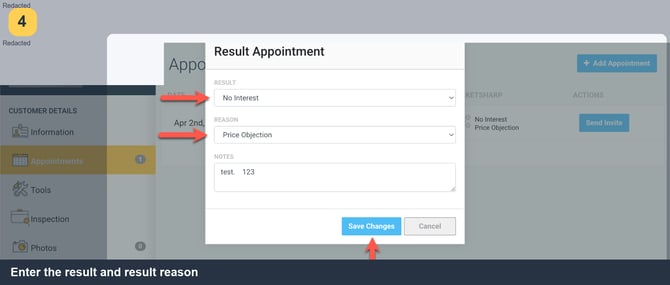
Image description: Result Appointment dialog with Result, Reason, notes, and Save Changes.
Step 11: Verify the result in MarketSharp
Open the corresponding MarketSharp appointment and confirm that the OCC result appears in Appointment Result and the OCC reason appears in Appointment Result Reason. This appointment result/reason update is the documented status-related writeback exception; it does not change the OCC job status in MarketSharp.
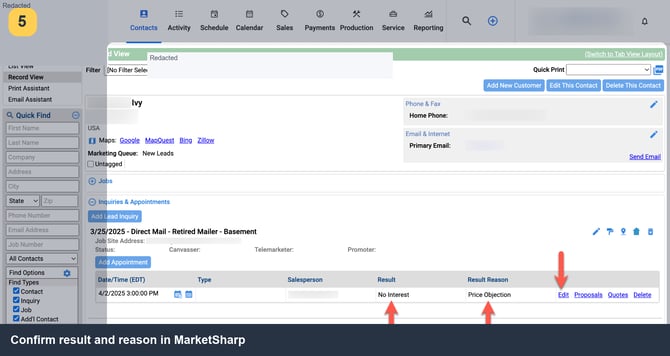
Image description: MarketSharp appointment record showing the result and result reason.
Step 12: Review notes on the MarketSharp appointment
Edit the appointment in MarketSharp to find the note information entered when the OCC appointment was resulted.
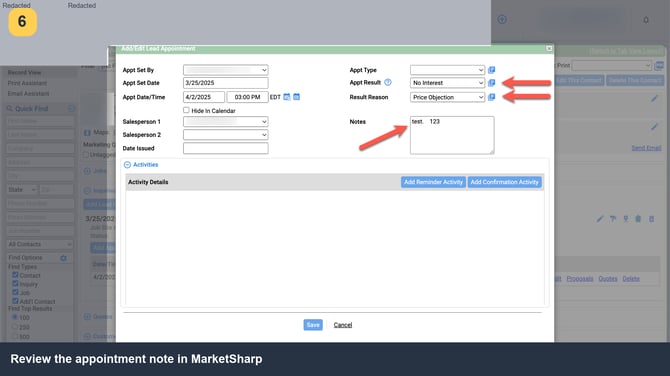
Image description: MarketSharp appointment edit form with result, reason, and notes visible.
Updates, deletion, and troubleshooting
-
MarketSharp to OCC: job updates are polled at the 15-minute interval above. An appointment assigned user change should be picked up on that schedule only if the new salesperson is actively mapped to an OCC user.
-
OCC to MarketSharp: most OCC updates are not pushed back. The documented exception is an OCC appointment's result and result reason, which update MarketSharp's Appointment Result and Appointment Result Reason fields. Changing an OCC job status does not sync it to MarketSharp.
-
Contact or inquiry deleted in MarketSharp: the OCC information becomes orphaned/unlinked. No delete update is reflected in OCC, and subsequent updates for the job are no longer pulled.
-
Appointment deleted in MarketSharp: the deletion is not pulled into OCC; existing OCC appointment data is not updated by that deletion.
-
Customer or appointment deleted in OCC: deleting the OCC customer does not delete the MarketSharp contact. Once an OCC appointment is deleted, it cannot be restored. To create another appointment from that lead, create a new Lead inquiry in MarketSharp and assign a new appointment to that new inquiry.
-
Job missing: check the active salesperson mapping, associated contact and inquiry, modification date or appointment date window, then run Sync if needed.
-
Result missing in MarketSharp: confirm Save Changes completed in OCC, then check the corresponding MarketSharp appointment's result and result reason fields.
-
Document missing: review the selected document category preference under Settings > Document Attachment Preferences and check the Contact associated with the inquiry in MarketSharp.